Prestashop Product Store Locator User Guide
Table Of Content
- 1. About Module.
- 2.Installation Guide.
- 3.Installation Guide.
- 4. Map General Settings Form Fields in details.
- 5. Map Control Settings Form.
- 6. Map Control Settings Form Fields in details..
- 7. Map Control Position Settings Form.
- 8. Map Control Position Settings Form Fields in details..
- 9. Work Process in Backend.
- 10. Work Process in Frontend.
1. About Module.
- This Module works on only ecommerce store created using Prestashop.
- This Module compatible with Prestashop above 1.7x.
- This Module is not free.
- This Module display on store product page.
2.Installation Guide.
- Login into your (Prestashop) store in administration panel.
- Go to Modules -> Upload a module.
- Select preproductstorelocator.zip you have downloaded in our store.
3.Installation Guide.
- After you have successfully installed module then after go to the module configure setting.
- All the fields explain in Map General Settings Form Fields in Details section.
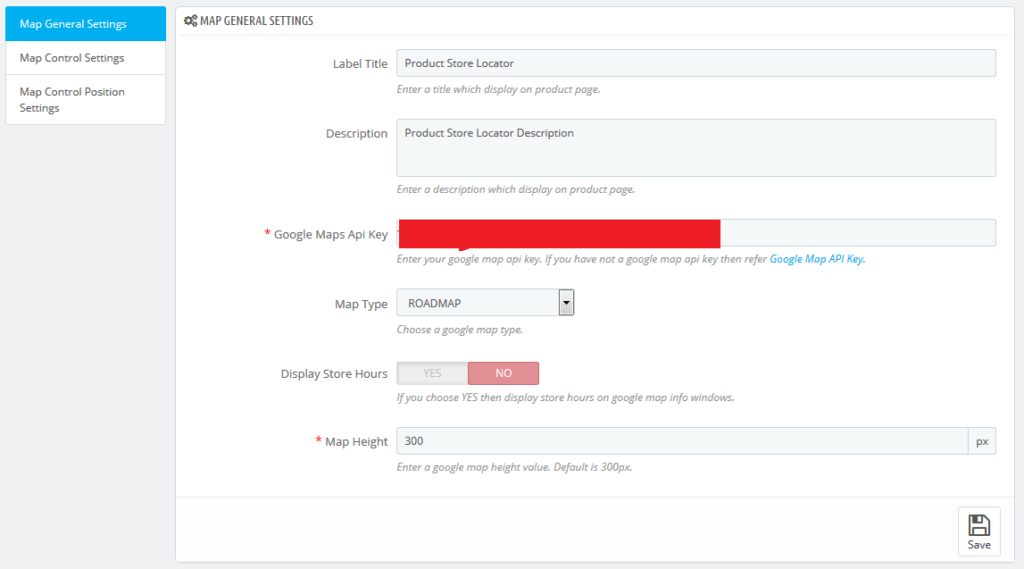
4. Map General Settings Form Fields in details.
- Label Title
- Default value:Product Store Locator
- Input value: Text
- Required: No.
- Descriptions: Enter a label title which is display on store product page.
- Description
- Default value:Null
- Input value: Text
- Required: No.
- Descriptions: Enter a description which display on store product page.
- Description
- Default value:Null
- Input value: Text
- Required: No.
- Descriptions: Enter your google map api key. If you have not a google map api key then refer Google Map API Key
- Map Type
- Default value:ROADMAP
- Input value: Select Box
- Descriptions: Choose google map type. The options are ROADMAP, SATELLITE, HYBRID and TERRAIN.
- Display Store Hours
- Default value:No
- Input value: Switch button
- Descriptions: If you choose YES then display store hours on google map info windows.
- Map Height
- Default value:300
- Input value: Numeric
- Descriptions: If Enter a google map height value. Default is 300px.
5. Map Control Settings Form.
-
- After you have successfully configured Map General Settings form then after configure Map Control Settings Form.
- All the fields explain in Map Control Settings Form Fields in Details Section.
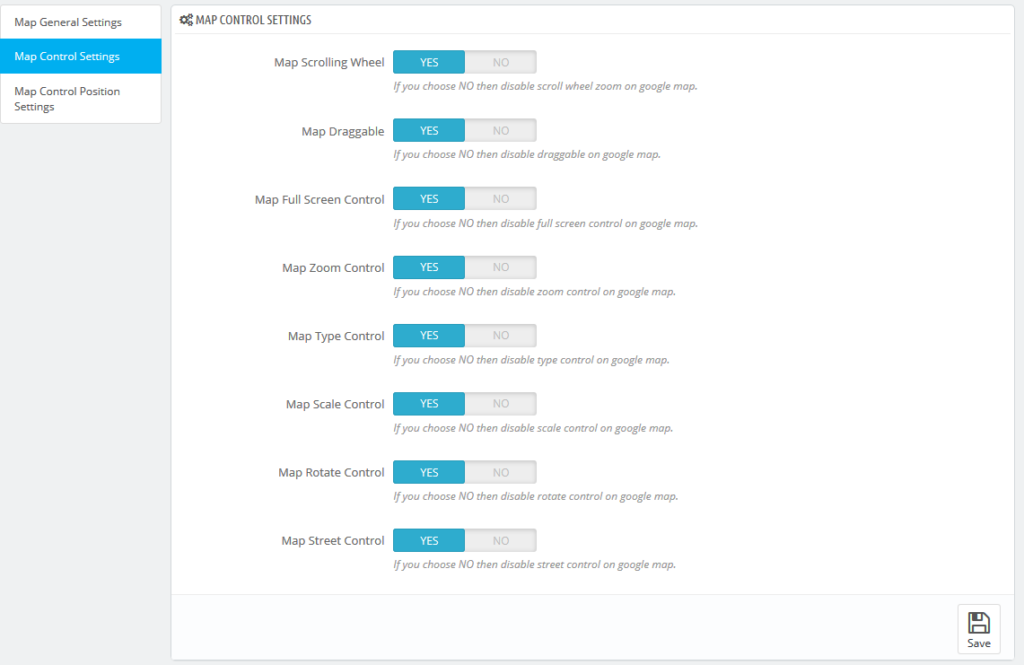
6. Map Control Settings Form Fields in details..
- Map Scrolling Whee
- Default value: Yes
- Input value: Switch button
- Descriptions:If you choose No then disable scroll wheel zoom on google map.
- Map Draggable
- Default value: Yes
- Input value: Switch button
- Descriptions:If you choose NO then disable draggable on google map.
- Map Full Screen Control
- Default value: Yes
- Input value: Switch button
- Descriptions:If you choose NO then disable full screen control on google map.
- Map Zoom Control
- Default value: Yes
- Input value: Switch button
- Descriptions:If you choose NO then disable zoom control on google map.
- Map Type Control
- Default value: Yes
- Input value: Switch button
- Descriptions:If you choose NO then disable type control on google map.
- Map Scale Control
- Default value: Yes
- Input value: Switch button
- Descriptions: If you choose NO then disable scale control on google map.
- Map Rotate Control
- Default value: Yes
- Input value: Switch button
- Descriptions: If you choose NO then disable rotate control on google map.
- Map Street Control
- Default value: Yes
- Input value: Switch button
- Descriptions:If you choose NO then disable street control on google map.
7. Map Control Position Settings Form.
- After you have successfully configured Map Control Settings form then after configure Map Control Position Settings Form.
- All the fields explain in Map Control Position Settings Form Fields in Details Section.
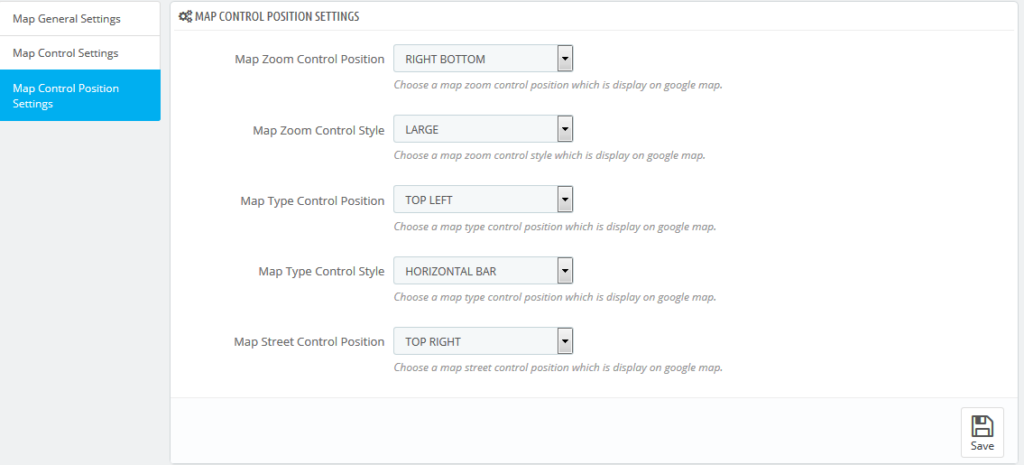
8. Map Control Position Settings Form Fields in details..
- Map Zoom Control Position
- Default value: RIGHT BOTTOM
- Input value: Select Box
- Descriptions: Choose zoom control position which is display on google map. The options are TOP LEFT, TOP RIGHT, LEFT TOP, RIGHT TOP, TOP CENTER, LEFT CENTER, RIGHT CENTER, BOTTOM RIGHT, LEFT BOTTOM, RIGHT BOTTOM, BOTTOM CENTER and BOTTOM LEFT.
- Map Zoom Control Style
- Default value: LARGE
- Input value: Select Box
- Descriptions: Choose zoom control style which is display on google map. The options are LARGE and SMALL.
- Map Type Control Position
- Default value: TOP LEFT
- Input value: Select Box
- Descriptions: Choose type control position which is display on google map. The options are TOP LEFT, TOP RIGHT, LEFT TOP, RIGHT TOP, TOP CENTER, LEFT CENTER, RIGHT CENTER, BOTTOM RIGHT, LEFT BOTTOM, RIGHT BOTTOM, BOTTOM CENTER and BOTTOM LEFT.
- Map Type Control Style
- Default value: HORIZONTAL BAR
- Input value: Select Box
- Descriptions: Choose type control style which is display on google map. The options are HORIZONTAL BAR and DROPDOWN MENU.
- Map Street Control Position
- Default value: TOP RIGHT
- Input value: Select Box
- Descriptions: Choose zoom control position which is display on googlemap. The options are TOP LEFT, TOP RIGHT, LEFT TOP, RIGHT TOP, TOP CENTER, LEFT CENTER, RIGHT CENTER, BOTTOM RIGHT, LEFT BOTTOM, RIGHT BOTTOM, BOTTOM CENTER and BOTTOM LEFT.
9. Work Process in Backend.
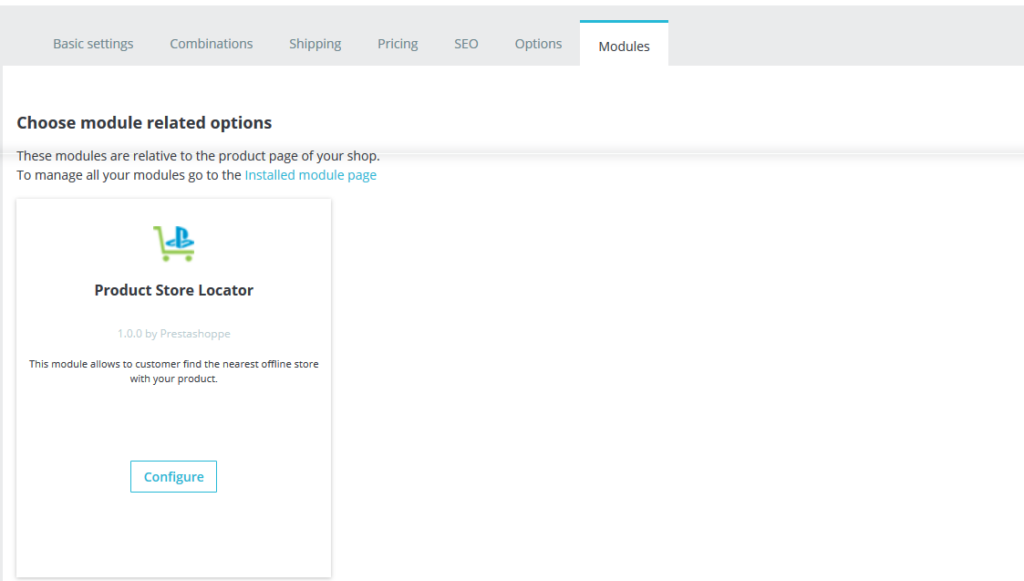
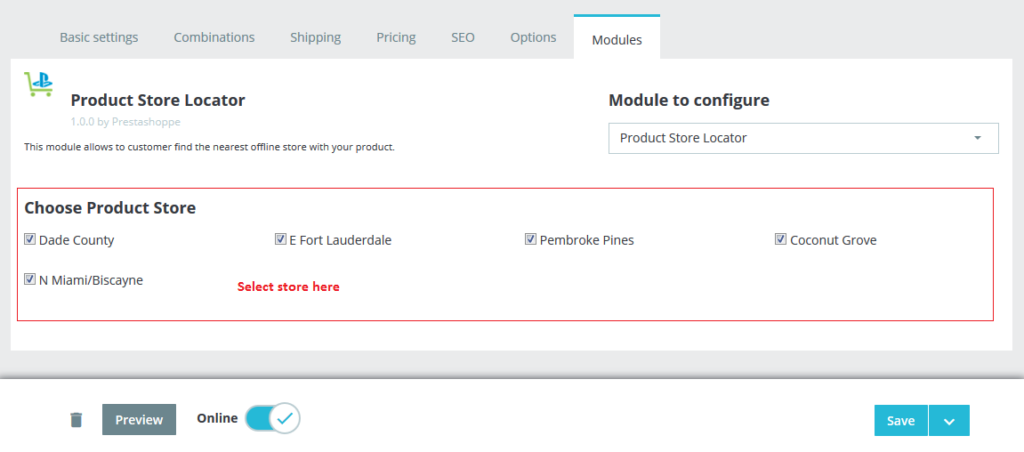
- If you have successfully configured all module form then after we need to add the store in product edit page.
- Go to Catalog->Product->Edit Product.
- You can see the Product Store Locator module inside module tab.
- See below image.
- Now configure Product Store Locator module.
- You can see the list of all available stores which is come from your Prestashop store admin.
- After select store and save the product.
- See below image
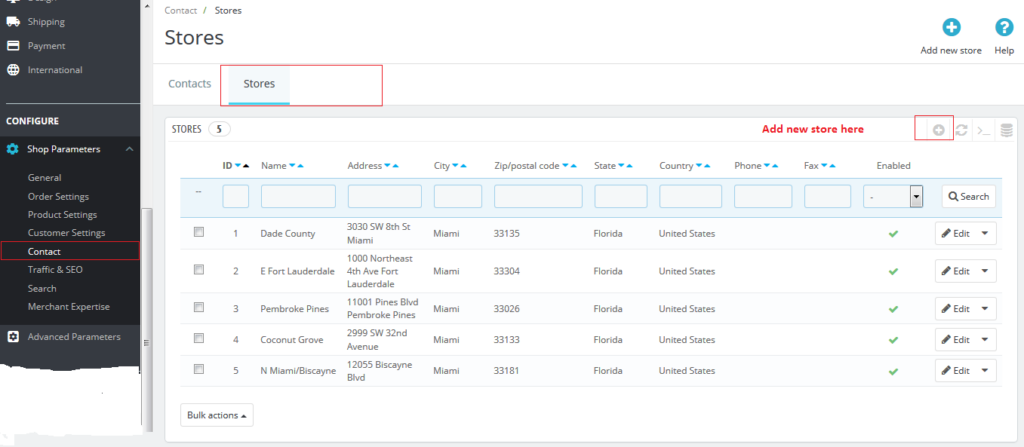
- If you not see the stores then you need to add the store in Shop Parameters-> Contact->Stores tab in your Prestashop store admin.
- See below image.
- Product stores added successfully in backend then after you can see google map with all added stores on product page.
- See below image.
10. Work Process in Frontend.

